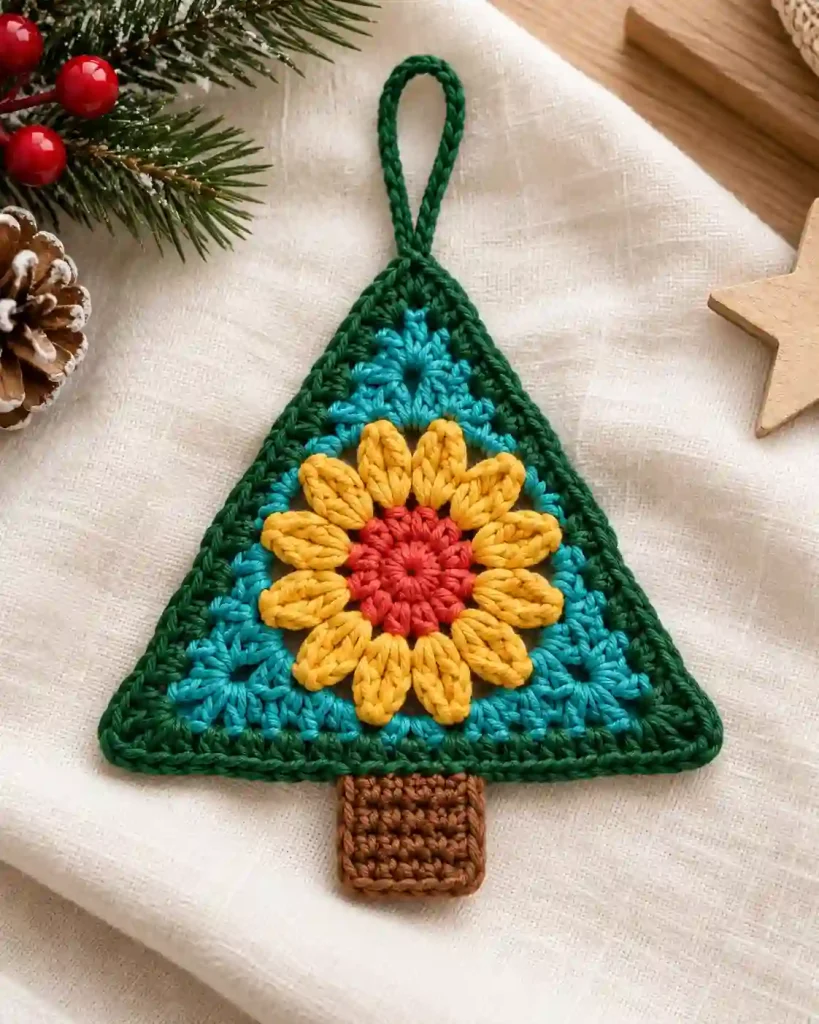
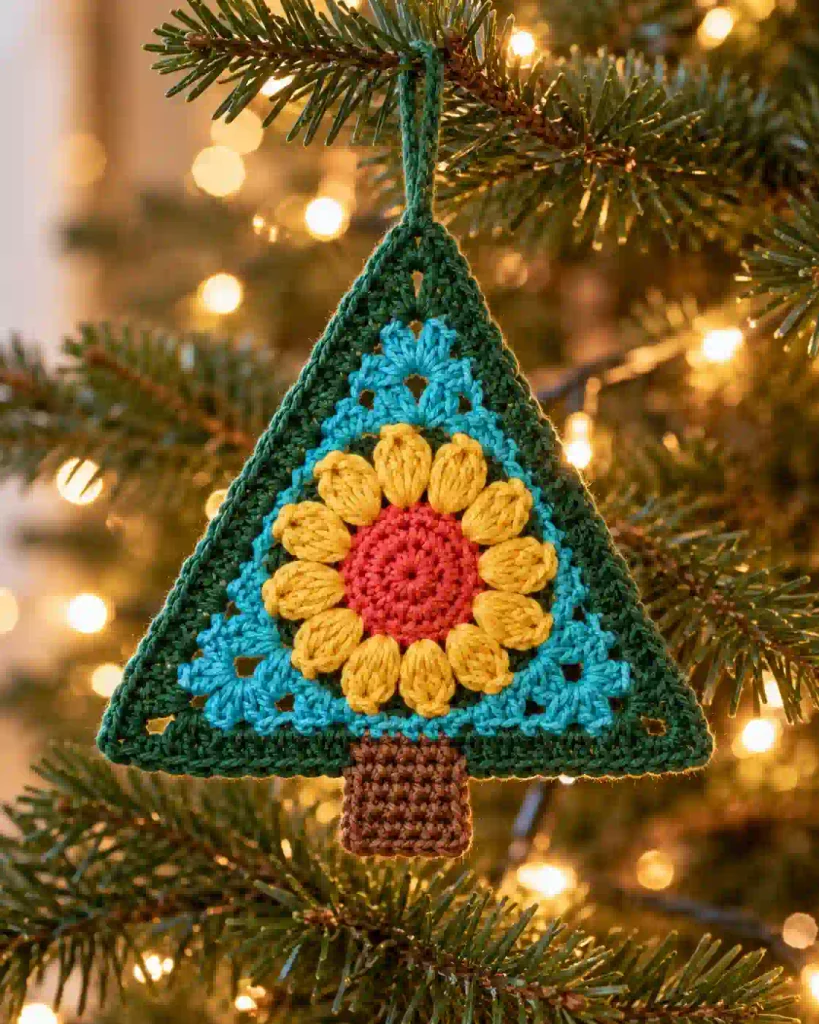
This Crochet Christmas Tree Ornament Pattern is a colorful way to make a handmade decoration for your Christmas tree, holiday garland, or gift wrapping. The design features a textured flower in the center, a triangular crochet border, a small trunk, and a simple hanging loop.
In this free tutorial, you’ll learn how to crochet the flower motif, shape three even corners, and assemble a lightweight ornament using basic stitches and a few small amounts of yarn.
Crochet Christmas Tree Ornament Pattern at a Glance
This handmade Christmas tree combines a decorative flower motif with a simple triangular outline. Instead of crocheting a traditional tree silhouette in rows, you’ll build the ornament from the center outward.
The flower begins with a circular base and a ring of raised cluster petals. Three evenly spaced corners then turn the circular motif into a triangle. A separate rectangular trunk and a yarn hanging loop complete the decoration.
Pattern details:
- Skill level: Adventurous beginner
- Terminology: US crochet terms
- Yarn weight: DK weight (category 3)
- Hook size: 4 mm
- Construction: Joined rounds with a separately crocheted trunk
- Estimated time: Approximately 60–90 minutes
- Finished width: Approximately 3.5–4.5 inches (9–11.5 cm)
- Finished height: Approximately 3.5–4.5 inches (9–11.5 cm), including the trunk but excluding the loop
- Gauge: Not critical for this decorative project
These measurements and time estimates are approximate because the pattern has not been physically tested.
One advantage of this Crochet Christmas Tree Ornament Pattern is its flat construction, which makes it easy to hang, pack away, or attach to a wrapped holiday gift.
Crochet Christmas Tree Ornament Pattern: Materials and Yarn Quantities
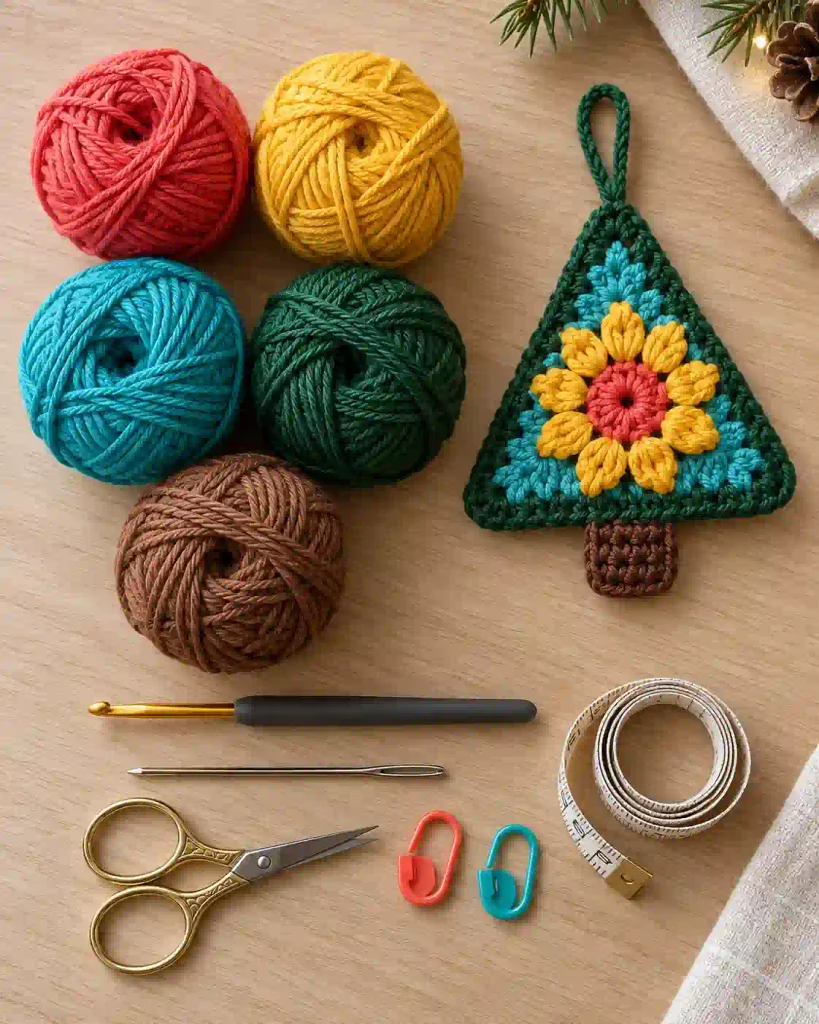
You can make this ornament using leftover DK yarn in five coordinating colors.
Materials:
- Color A – Flower center: Coral or red, approximately 3–5 yards (3–4.5 meters)
- Color B – Flower petals: Golden yellow, approximately 5–8 yards (4.5–7.5 meters)
- Color C – Inner triangle: Turquoise, approximately 8–12 yards (7–11 meters)
- Color D – Outer triangle: Teal or forest green, approximately 8–12 yards (7–11 meters)
- Color E – Trunk: Brown or terracotta, approximately 3–5 yards (3–4.5 meters)
- Hanging loop: Approximately 10–12 inches (25–30 cm) of Color C or D
- 4 mm crochet hook
- Blunt yarn needle
- Scissors
- Stitch markers, optional
- Measuring tape
- Blocking mat and rustproof pins, optional
The yarn amounts are estimates, not measured quantities from a tested sample.
For this Crochet Christmas Tree Ornament Pattern, choosing yarns of similar thickness helps keep the flower petals, triangular border, and trunk in proportion.
Cotton yarn provides clear stitch definition and a relatively firm finish. A cotton-acrylic blend can also work well, while soft acrylic produces a more flexible ornament.
If you’re unsure which yarn thickness to choose, consult the Craft Yarn Council’s Standard Yarn Weight System. This resource explains yarn categories and can help you select suitable substitutions.
Crochet Christmas Tree Ornament Pattern: Abbreviations and Special Stitches
This tutorial uses standard US crochet terminology.
| Abbreviation | Meaning |
|---|---|
| ch | Chain |
| sc | Single crochet |
| dc | Double crochet |
| sl st | Slip stitch |
| st / sts | Stitch / stitches |
| sp | Space |
| RS | Right side |
| WS | Wrong side |
3-dc cluster (3dc-cl): Yarn over, insert the hook into the indicated stitch, pull up a loop, yarn over, and pull through two loops. Repeat this partial double crochet twice more in the same stitch. Yarn over and pull through all four loops remaining on the hook.
Beginning 3-dc cluster: Chain 2, then work two partial double crochets into the same stitch. Yarn over and pull through all three loops on the hook.
Corner: A group of stitches and chains worked into one corner space.
For additional help with US crochet terms, see the Craft Yarn Council’s Crochet Abbreviations Guide.
Crochet Christmas Tree Ornament Pattern Gauge, Size and Notes
The finished tree should measure approximately 3.5–4.5 inches (9–11.5 cm) wide and 3.5–4.5 inches (9–11.5 cm) tall, including the trunk but excluding the hanging loop.
These dimensions are estimates rather than measurements from a completed sample.
Gauge is not critical because the ornament does not need to fit a particular body measurement. However, even tension helps the triangle lie flat and maintain balanced corners.
For a general DK yarn reference, approximately 16–20 double crochet stitches and 8–11 rows over 4 inches (10 cm) may be a useful starting range. This is not a verified gauge for the ornament.
Measure a separate double crochet swatch if you want to compare your tension.
The flower and triangular border are worked in joined rounds. The trunk is made in turned rows.
Slip stitch joins do not count as stitches. Count chain spaces separately from double crochet stitches.
Because this Crochet Christmas Tree Ornament Pattern is intended for decoration, consistent stitch tension matters more than matching an exact gauge.
Crochet Christmas Tree Ornament Pattern: Method Overview
The ornament is built in four stages.
First, crochet a circular flower center using Color A. This creates the foundation for the raised petals.
Second, join Color B and crochet twelve textured cluster petals. The petals form a colorful ring around the center.
Third, join Color C and create three evenly spaced corners. These corners transform the circular flower into a triangle. A final round in Color D strengthens the outline and defines the Christmas tree shape.
Finally, crochet a small trunk in Color E, sew it behind the lower edge, and attach a hanging loop to the upper corner.
The Crochet Christmas Tree Ornament Pattern is worked mostly in joined rounds, so you won’t need to crochet separate branches or stuff the ornament.
Before beginning the triangular section, identify the twelve spaces between the flower petals. Correct placement of the corner groups will help the finished tree look balanced.
Step-by-Step Crochet Christmas Tree Ornament Tutorial
Step 1: Crochet the Flower Center and Petals
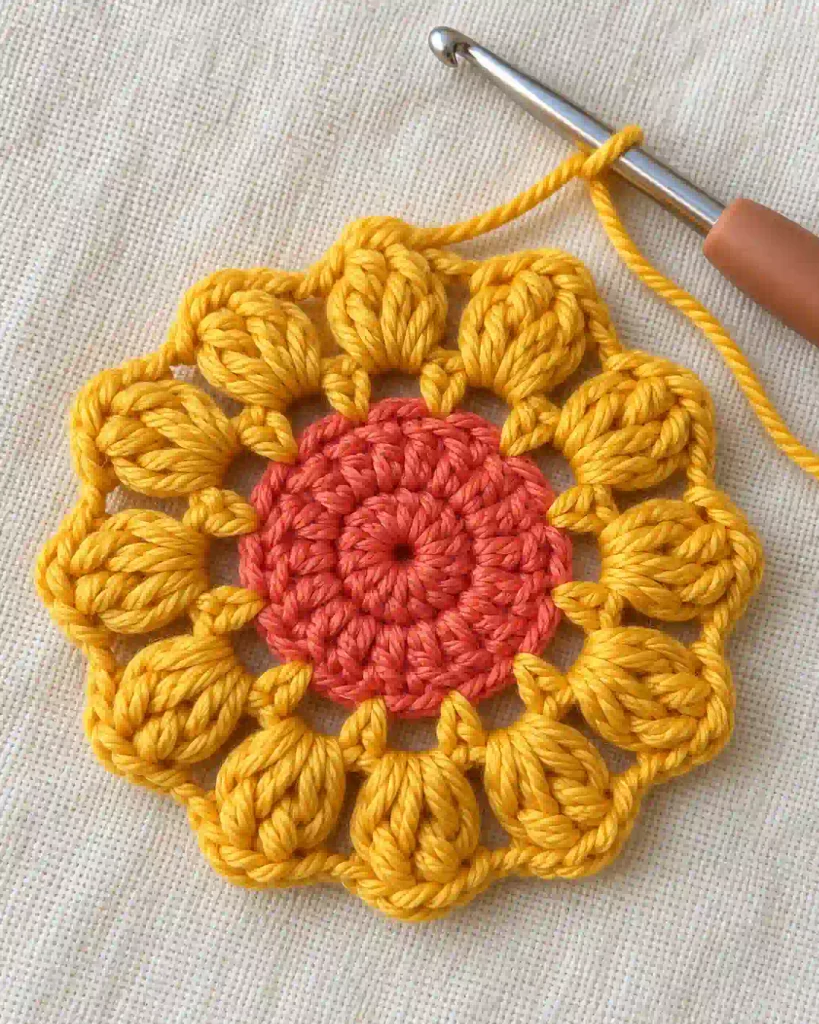
Using Color A and a 4 mm hook, begin with a small foundation ring.
Foundation: Ch 4. Join with a sl st to the first chain to form a ring.
Round 1: Ch 1. Work 12 sc into the ring. Join with a sl st to the first sc. (12 sc)
Round 2: Ch 3, counting as the first dc. Work 1 dc into the same stitch, then 2 dc into each of the remaining 11 stitches. Join with a sl st to the top of the beginning ch-3. (24 dc)
Fasten off Color A.
Join Color B in any double crochet stitch.
Round 3: Work a beginning 3-dc cluster in the first stitch, ch 1, and skip the next stitch. Repeat [3dc-cl in the next stitch, ch 1, skip the next stitch] 11 times. Join with a sl st to the top of the beginning cluster. (12 clusters and 12 ch-1 spaces)
Fasten off Color B.
Your flower should now have twelve raised petals surrounding the circular center.
Count the clusters carefully. Each cluster is worked into every other stitch from Round 2.
Step 2: Create the Three Triangular Corners
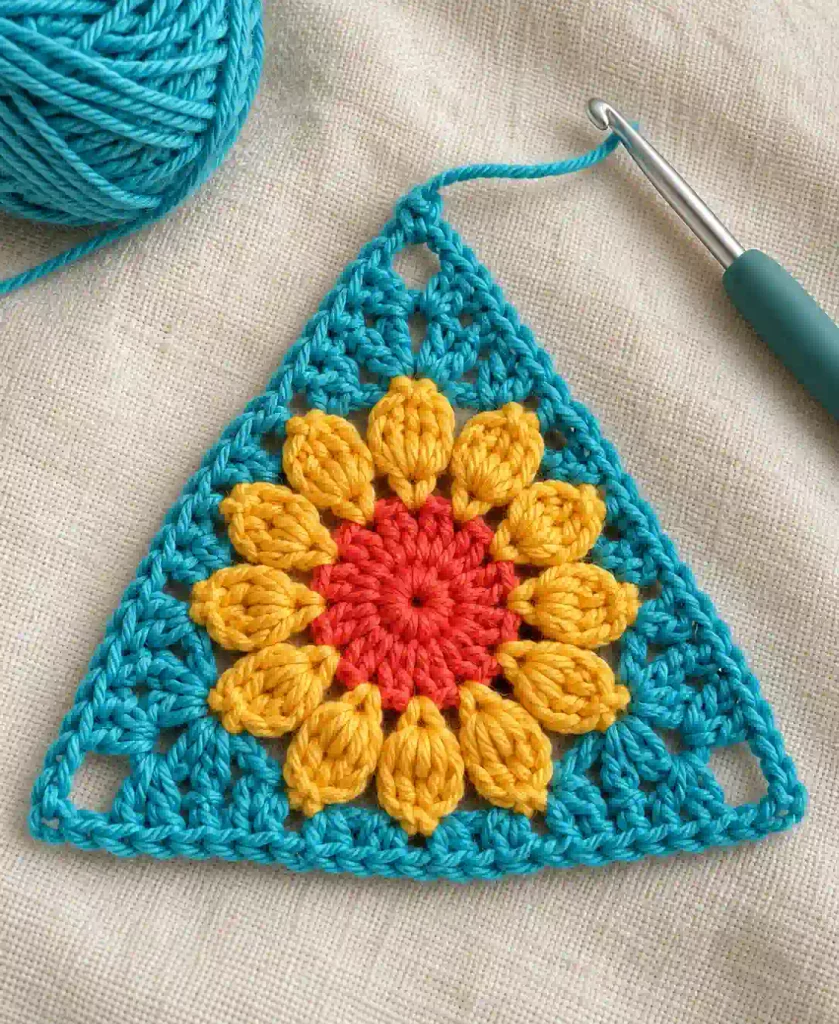
Join Color C in any chain-1 space between two flower clusters.
Round 4 creates the three corners that define the Christmas tree shape.
Round 4:
- In the first ch-1 space, work (3 dc, ch 2, 3 dc). This forms Corner 1.
- Work 3 dc into each of the next three ch-1 spaces.
- In the next ch-1 space, work (3 dc, ch 2, 3 dc). This forms Corner 2.
- Work 3 dc into each of the next three ch-1 spaces.
- In the next ch-1 space, work (3 dc, ch 2, 3 dc). This forms Corner 3.
- Work 3 dc into each of the remaining three ch-1 spaces.
- Join with a sl st to the first dc.
Round 4 count: 54 dc and three ch-2 corner spaces.
Fasten off Color C.
Place the motif flat with one corner pointing upward. The other two corners will become the lower left and lower right points of the tree.
Each side contains eighteen double crochet stitches between its neighboring corner spaces.
The motif should now have a clear triangular structure.
If the corners are not evenly spaced, check that each corner is followed by three ordinary groups of three double crochet stitches before the next corner.
Avoid adding extra stitches between the groups.
Step 3: Crochet the Outer Christmas Tree Border
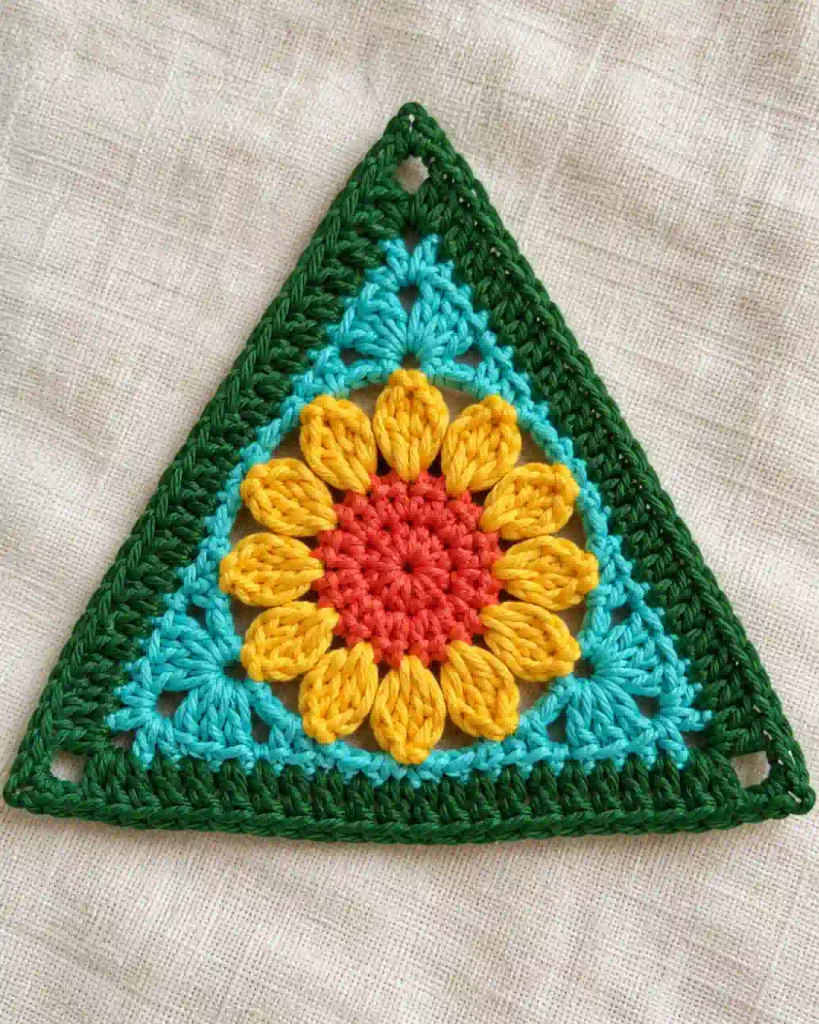
Join Color D in any corner ch-2 space.
This round creates a stronger outline around the flower motif.
Round 5:
- In the first corner space, work (3 dc, ch 2, 3 dc).
- Work 1 dc in each of the next 18 dc along the first side.
- In the next corner space, work (3 dc, ch 2, 3 dc).
- Work 1 dc in each of the next 18 dc along the second side.
- In the next corner space, work (3 dc, ch 2, 3 dc).
- Work 1 dc in each of the final 18 dc along the third side.
- Join with a sl st to the first dc.
Round 5 count: 72 dc and three ch-2 corner spaces.
Fasten off Color D.
The outer border should create three distinct corners and relatively straight sides.
Lay the triangle flat and check its shape before continuing.
If the edges look slightly uneven, gently smooth them with your fingers. Do not add extra stitches to correct the shape unless you have checked the stitch counts first.
For this Crochet Christmas Tree Ornament Pattern, the three corner increases are what create the triangular outline.
Crochet Christmas Tree Ornament Pattern: Assembly
Crochet the Small Tree Trunk
Using Color E, ch 5.
Row 1: Work 1 sc in the second chain from the hook and 1 sc in each remaining chain. Ch 1, turn. (4 sc)
Row 2: Work 1 sc in each stitch across. Ch 1, turn. (4 sc)
Row 3: Work 1 sc in each stitch across. (4 sc)
Fasten off, leaving a yarn tail approximately 10 inches (25 cm) long.
Position the triangle with one corner pointing upward.
Place the trunk behind the center of the bottom edge, overlapping approximately one row of the trunk with the triangle.
Sew the trunk securely to the wrong side using the long yarn tail.
Add the Hanging Loop
Cut a 10–12-inch (25–30 cm) strand of Color C or D.
Thread it through the upper corner space with a yarn needle.
Bring both ends together to create a loop approximately 2 inches (5 cm) long when flattened.
Tie the ends securely at the back and weave the tails into the crochet fabric.
Check that the ornament hangs straight and that the trunk remains centered.
Crochet Christmas Tree Ornament Pattern: Finishing and Care
Weave in all loose yarn ends on the wrong side of the ornament.
Pass each tail through several nearby stitches and change direction before trimming it.
Lay the finished tree flat and check that the three corners are balanced.
If the fabric looks uneven, gentle blocking may help improve its shape.
Always check the yarn label before wetting, steaming, or applying heat.
For yarn suitable for wet blocking, lightly dampen the ornament, shape it on a blocking mat, and allow it to dry completely.
Avoid applying high heat directly to acrylic yarn.
Gently lift the flower petals with your fingers if they appear flattened.
Before displaying the ornament, check the trunk seam and hanging loop for security.
When storing your Crochet Christmas Tree Ornament Pattern project, keep the finished decoration flat to protect the triangular outline and textured flower center.
FAQs and Troubleshooting for Crochet Christmas Tree Ornament Pattern
1. Why does my flower have fewer than twelve petals?
Round 3 requires twelve clusters.
Each cluster is worked into every other stitch of Round 2, which contains 24 double crochet stitches.
If you have fewer than twelve petals, check whether you accidentally skipped more than one stitch between clusters.
If you have extra petals, make sure you have not worked into the slip stitch join.
Count all twelve clusters before beginning the triangular border.
2. Why does my Christmas tree look uneven?
The three corners must be evenly spaced.
Round 4 contains three corner groups, with three ordinary groups of three double crochet stitches between each pair of corners.
Each corner should contain (3 dc, ch 2, 3 dc).
Round 5 should contain eighteen double crochet stitches along each side between the corner spaces.
An incorrect stitch count can make one side longer than another.
3. Can I use worsted weight yarn instead of DK yarn?
Yes, but the finished ornament will probably be larger and thicker.
Use a hook appropriate for the yarn, potentially around 4.5–5 mm depending on your tension.
Try to use the same yarn weight for all colors.
Your finished measurements and yarn consumption will differ from the estimates given here.
4. How can I make a smaller Christmas tree ornament?
Try using sport weight yarn with a suitable smaller hook.
Keeping the same stitch counts while using thinner yarn will generally create a smaller motif.
You can also experiment with omitting the final border round, although the triangle may look less defined.
These modifications have not been tested for exact dimensions.
5. How should I clean my crochet Christmas tree ornament?
Follow the care instructions for the most delicate yarn used in the ornament.
Because this project combines several colors, consider the possibility of color bleeding before washing.
If washing is permitted, use a gentle method appropriate for the fiber.
Reshape the ornament while damp and allow it to dry completely before storing it.
For delicate decorations, light surface cleaning may be preferable.
Final Thoughts
This Crochet Christmas Tree Ornament Pattern combines colorful flower motifs with festive holiday decorating in a small, satisfying project. The textured petals create a cheerful focal point, while the triangular border, contrasting trunk, and hanging loop complete the handmade Christmas tree.
Experiment with different yarn colors to create matching ornaments, use leftover yarn for a bright collection, or attach a finished tree to a wrapped present.
For another festive project, explore our Crochet Mini Christmas Wreath Ornament Pattern. Together, these decorations can bring a coordinated handmade touch to your Christmas tree or seasonal garland.