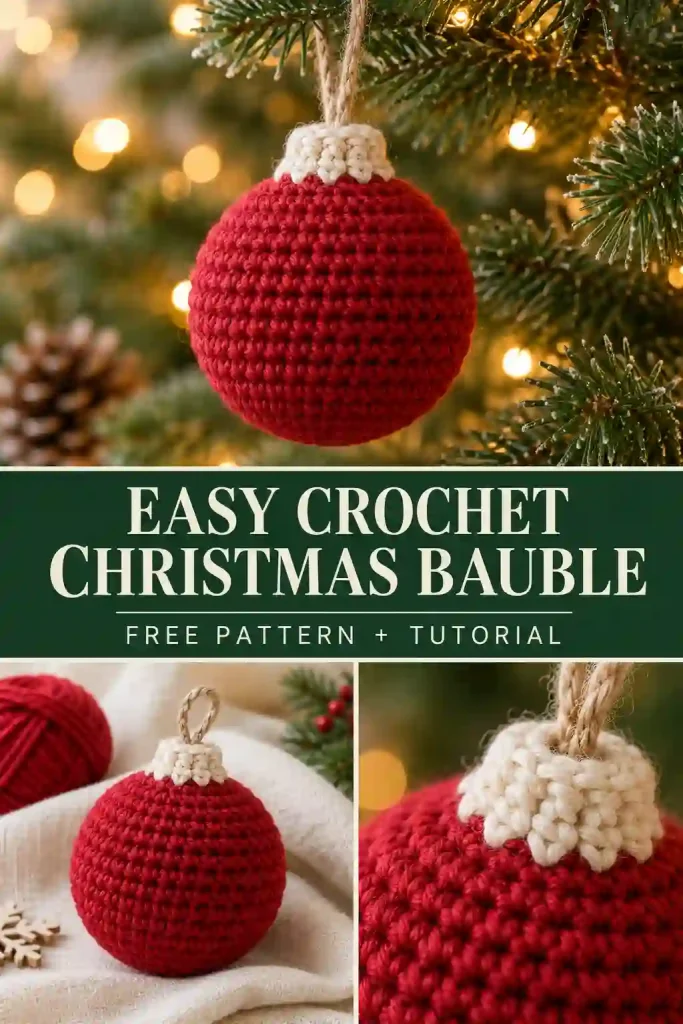
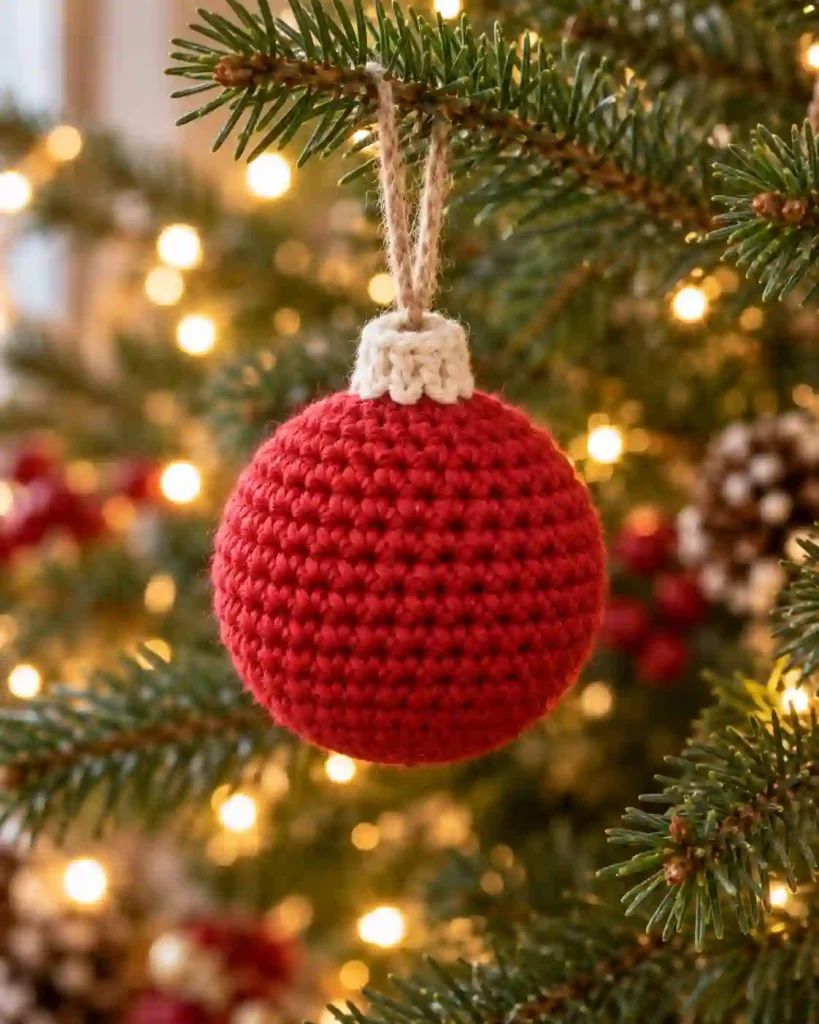
This Easy Crochet Christmas Bauble Pattern is a lovely way to bring handmade charm to your holiday decorations. With its rounded shape, soft crocheted texture, and simple hanging loop, this little ornament looks beautiful on a Christmas tree or festive garland. In this free tutorial, you’ll learn how to crochet a stuffed bauble, shape its top and bottom, add a decorative cap, and finish it with a secure loop for hanging.
Easy Crochet Christmas Bauble Pattern at a Glance
This Christmas bauble is a small, stuffed amigurumi ornament worked mainly in continuous spiral rounds. The rounded body is crocheted in one piece, then finished with a separate decorative cap and hanging loop.
The Easy Crochet Christmas Bauble Pattern is suitable for confident beginners who already know how to make single crochet stitches, increases, and invisible decreases.
Pattern details:
- Skill level: Confident beginner
- Terminology: US crochet terms
- Yarn weight: Worsted weight, category 4
- Hook size: 3.5 mm
- Construction: Continuous spiral rounds with a separately crocheted cap
- Estimated making time: Approximately 45–75 minutes
- Finished bauble diameter: Approximately 2.5–3 inches (6.5–7.5 cm)
- Finished height: Approximately 3–3.5 inches (7.5–9 cm), excluding the hanging loop
- Gauge: Not critical, but tight stitches are important
- Finishing: Stuffing, closing, sewing the cap, and attaching a loop
The dimensions, yarn quantities, and completion time are approximate estimates because this original pattern has not been physically tested.
The finished ornament is lightweight and suitable for indoor seasonal decorating.
Easy Crochet Christmas Bauble Pattern: Materials and Yarn Quantities
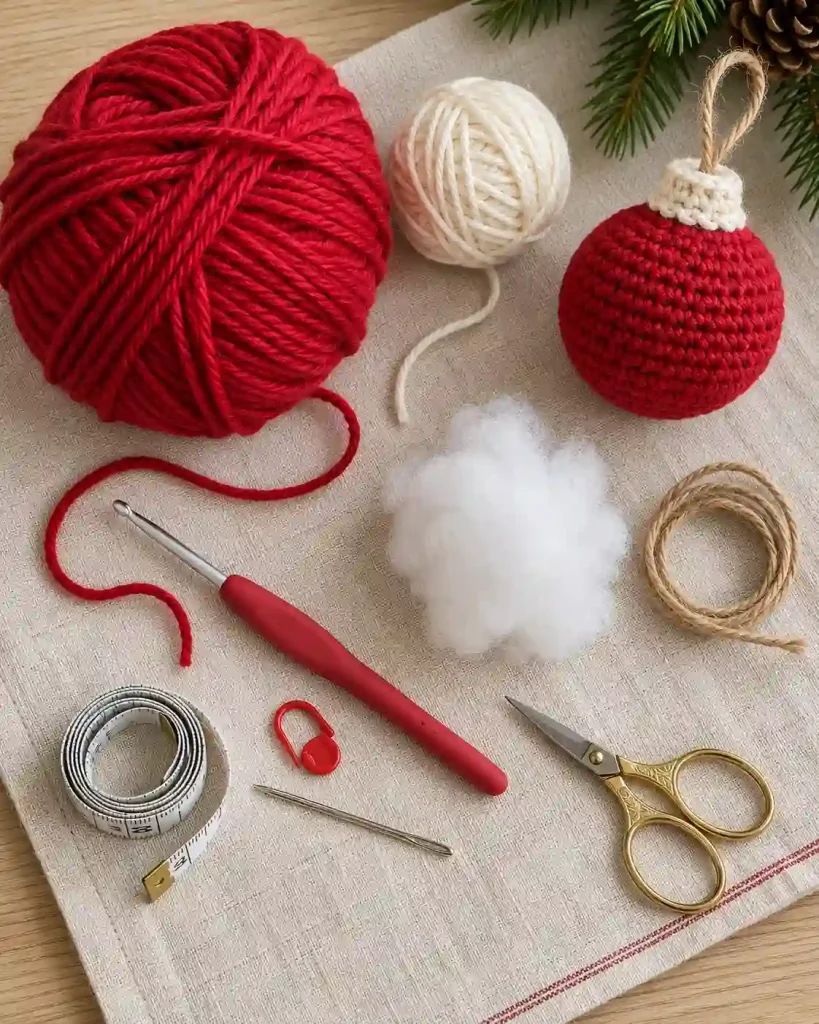
You only need a few basic crochet supplies to make this handmade Christmas decoration.
Materials:
- Worsted weight yarn, category 4, main color: Approximately 25–35 yards (23–32 meters)
- Worsted weight yarn, contrasting color for the cap: Approximately 3–5 yards (3–4.5 meters)
- 3.5 mm crochet hook
- Polyester fiberfill, approximately 5–10 grams
- Blunt tapestry needle
- Small scissors
- Stitch marker
- Measuring tape
- Approximately 8–10 inches (20–25 cm) of ribbon, twine, or matching yarn for the hanging loop
Yarn and stuffing quantities are estimates, not measurements from a tested sample.
For this Easy Crochet Christmas Bauble Pattern, smooth acrylic or cotton yarn works well.
Acrylic produces a soft, lightweight ornament, while cotton often provides more visible stitch definition and a firmer fabric.
Choose classic Christmas colors such as crimson red, forest green, ivory, or gold.
For a coordinated tree, make several baubles in different colors while keeping the same cap design.
If you substitute another yarn weight, select a hook that creates tight stitches without large gaps.
For another festive take on handmade Christmas ornaments, explore the Christmas Bauble Crochet Pattern by Stitch by Fay. This alternative design offers additional inspiration for creating personalized crochet decorations for your Christmas tree.
Easy Crochet Christmas Bauble Pattern: Abbreviations and Special Stitches
This tutorial uses US crochet terminology.
| Abbreviation | Meaning |
|---|---|
| MR | Magic ring |
| sc | Single crochet |
| inc | Increase: 2 sc in the same stitch |
| dec | Invisible single crochet decrease |
| ch | Chain |
| sl st | Slip stitch |
| st / sts | Stitch / stitches |
| rnd | Round |
Invisible decrease: Insert the hook through the front loops of the next two stitches, yarn over and pull through both front loops, then yarn over and pull through the remaining two loops.
Repeat notation: Instructions inside parentheses followed by ×6 are repeated six times.
Continuous rounds: Do not join or turn at the end of each round unless instructed.
Use a stitch marker to identify the beginning of each round.
The decorative cap is worked in joined rounds, unlike the main bauble body.
Easy Crochet Christmas Bauble Pattern Gauge, Size and Notes
The finished bauble is expected to measure approximately 2.5–3 inches (6.5–7.5 cm) in diameter when made with worsted weight yarn and a 3.5 mm crochet hook.
Gauge is not critical for a decorative ornament, but the stitches should be tight enough to prevent the fiberfill from showing through.
There is no required stitches-per-inch or rows-per-inch gauge for this pattern.
Instead, crochet a small sample of the first few rounds and check that the fabric feels firm without becoming difficult to work.
The Easy Crochet Christmas Bauble Pattern uses continuous spiral rounds for the body and joined rounds for the decorative cap.
The body reaches a maximum circumference of 42 stitches.
Count stitches at the end of each round, especially after increases and decreases.
If your ornament is larger than expected, try a smaller hook or thinner yarn.
Avoid overstuffing, which can stretch the stitches and distort the spherical shape.
Easy Crochet Christmas Bauble Pattern: Method Overview
This Christmas ornament is constructed in three main stages.
First, crochet the lower half of the bauble, beginning with a magic ring and gradually increasing to create a rounded base.
Next, work several even rounds to establish the widest part of the ornament.
Then decrease gradually to shape the upper half, adding fiberfill before closing the opening.
Once the spherical body is complete, crochet a small decorative cap in a contrasting yarn color.
The cap is sewn securely to the top center of the bauble.
Finally, attach a hanging loop through the cap and check that the ornament hangs straight.
The Easy Crochet Christmas Bauble Pattern does not require plastic ornament inserts or complicated assembly.
Its soft stuffed construction makes it suitable for lightweight indoor Christmas decorations.
For a more decorative version, you can experiment with color changes or simple embroidered details after mastering the basic pattern.
Step-by-Step Easy Crochet Christmas Bauble Tutorial
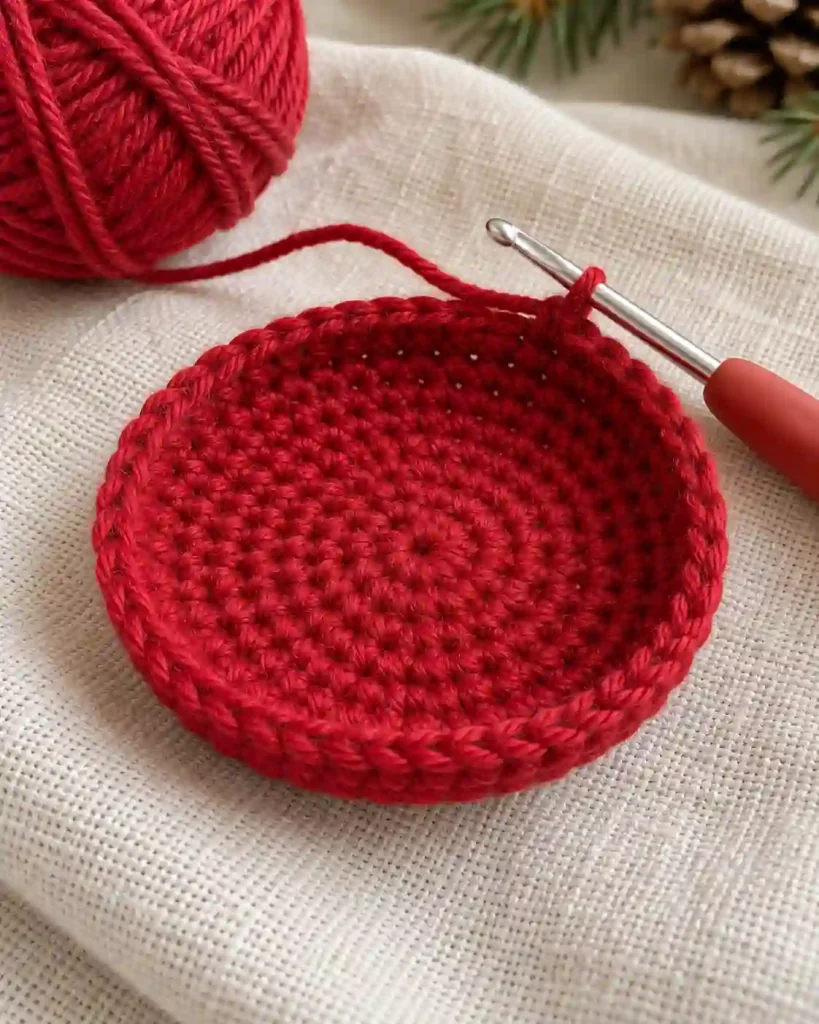
Step 1: Crochet the Rounded Bauble Base
Using your main yarn color and a 3.5 mm crochet hook, begin with a magic ring.
Work in continuous spiral rounds.
Round 1: 6 sc into MR. (6)
Round 2: Inc in each st around. (12)
Round 3: (1 sc, inc) ×6. (18)
Round 4: (2 sc, inc) ×6. (24)
Round 5: (3 sc, inc) ×6. (30)
Round 6: (4 sc, inc) ×6. (36)
Round 7: (5 sc, inc) ×6. (42)
The stitch count increases by six stitches in each round.
By the end of Round 7, the crochet piece should resemble a shallow rounded bowl.
Move the stitch marker to the first stitch of each new round.
Keep your tension even and avoid pulling the yarn too tightly.
The increases are distributed evenly to create a smooth circular base.
If the fabric begins to curl slightly upward, that is normal as the bauble starts forming its three-dimensional shape.
Before moving to the next stage, confirm that Round 7 contains exactly 42 stitches.
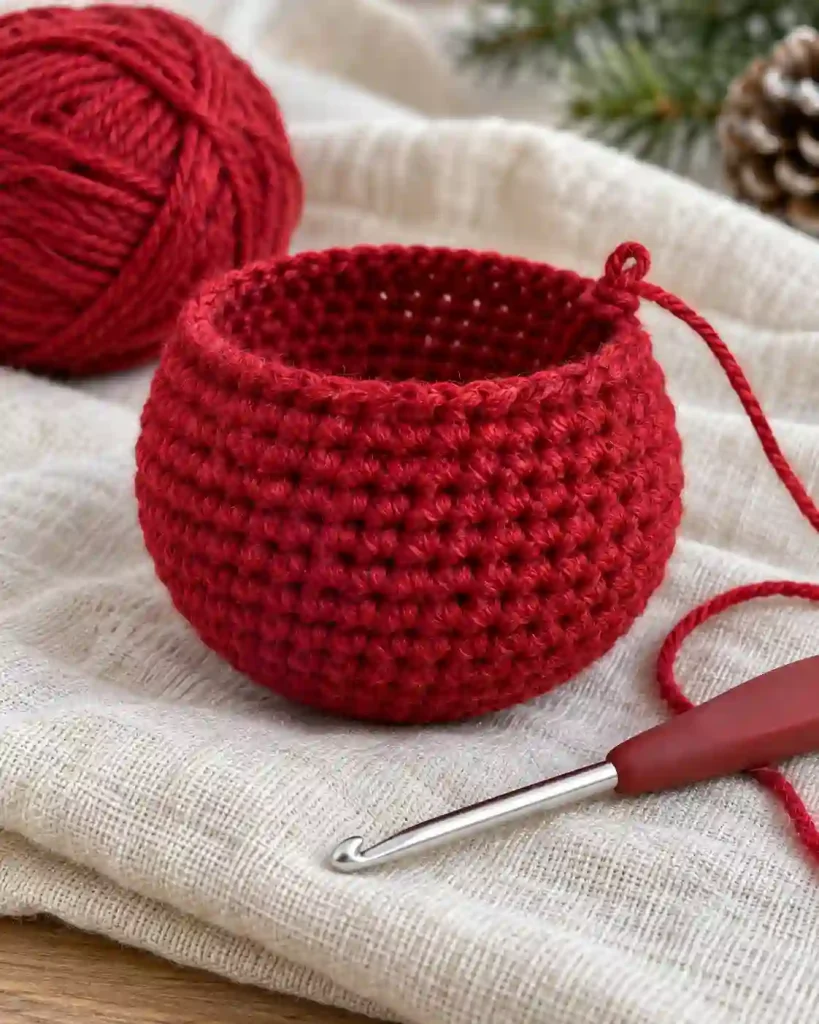
Step 2: Build the Round Bauble Body
The next rounds create the widest section of the ornament.
Continue using the same main yarn color.
Round 8: Sc in each st around. (42)
Round 9: Sc in each st around. (42)
Round 10: Sc in each st around. (42)
Round 11: Sc in each st around. (42)
Round 12: Sc in each st around. (42)
Round 13: Sc in each st around. (42)
Round 14: Sc in each st around. (42)
Round 15: Sc in each st around. (42)
You now have eight even rounds at the maximum circumference.
The Easy Crochet Christmas Bauble Pattern should begin to resemble a rounded cup with a gently curved lower section.
Keep the stitch count at 42 throughout this stage.
Do not increase or decrease during these rounds.
If you want to add stripes, change yarn colors at the beginning of selected rounds while maintaining the same stitch counts.
For a simple beginner version, continue in one color.
The body should remain flexible enough to stuff but firm enough to hold its shape.
Before beginning the decreases, check that the stitches are even and that there are no large gaps in the fabric.
The upper half will be shaped in the next stage.
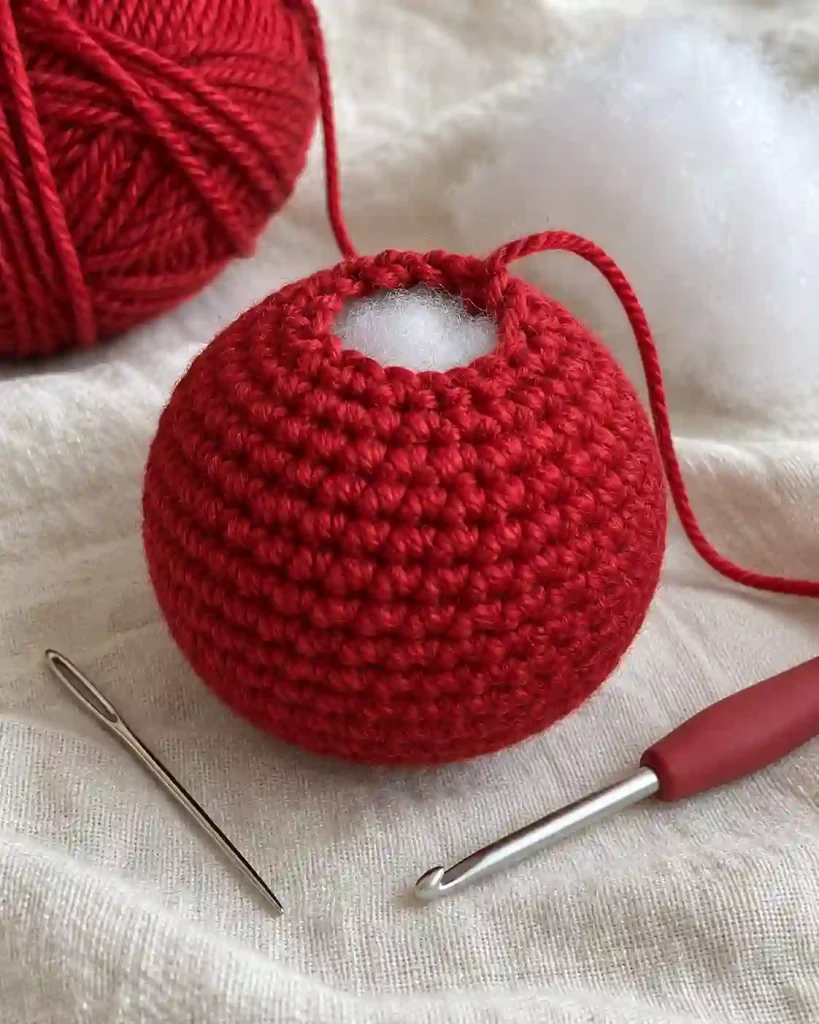
Step 3: Decrease, Stuff, and Close the Bauble
This stage completes the spherical shape.
Continue in continuous rounds.
Round 16: (5 sc, dec) ×6. (36)
Round 17: (4 sc, dec) ×6. (30)
Round 18: (3 sc, dec) ×6. (24)
Round 19: (2 sc, dec) ×6. (18)
Begin adding polyester fiberfill.
Distribute the stuffing evenly around the inside of the ornament.
Round 20: (1 sc, dec) ×6. (12)
Add a little more fiberfill if needed.
Round 21: Dec ×6. (6)
Fasten off, leaving a yarn tail approximately 8 inches (20 cm) long.
Thread the tail through a tapestry needle.
Pass the needle through the front loops of the remaining six stitches and pull gently to close the opening.
Weave the tail securely into the body.
The finished bauble should have a rounded shape without large gaps or visible stuffing.
Avoid packing the fiberfill too tightly.
The Easy Crochet Christmas Bauble Pattern should feel softly firm when gently squeezed.
The decorative cap will cover the closed top of the ornament.
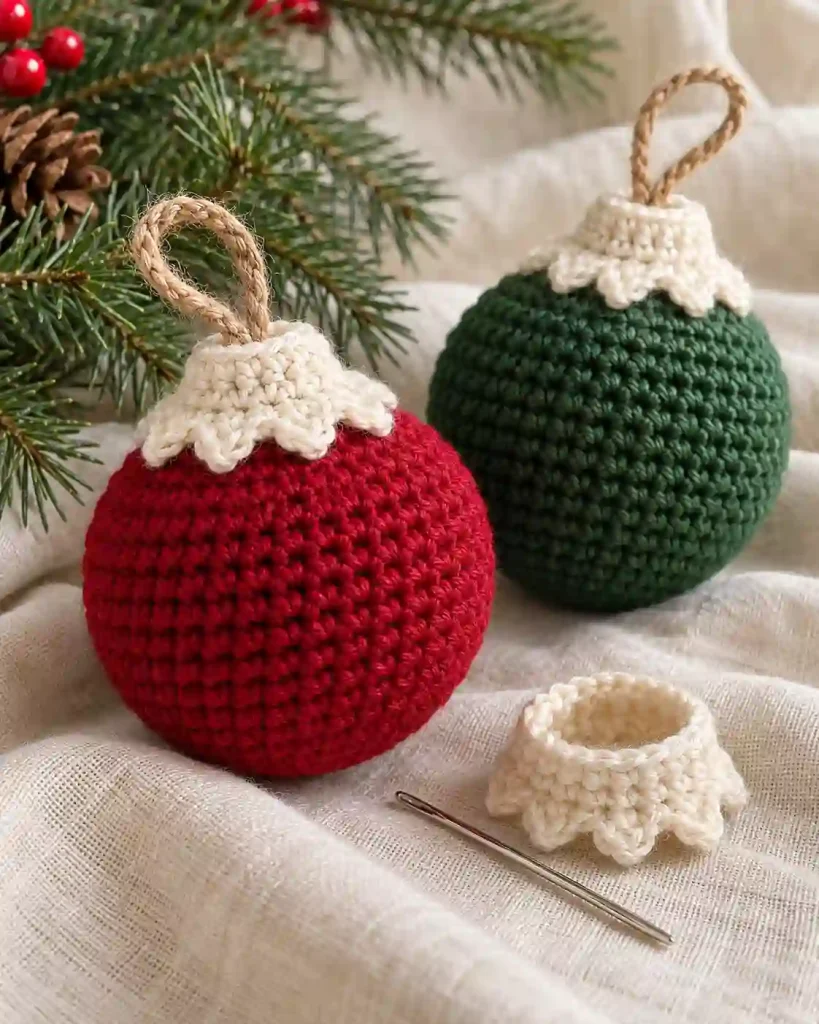
Easy Crochet Christmas Bauble Pattern: Decorative Cap
The cap gives the ornament the appearance of a traditional Christmas bauble.
Using your contrasting yarn color and the same 3.5 mm hook, crochet a small circular cap.
Round 1: Make a magic ring and work 6 sc into it. Join with a sl st into the first sc. (6)
Round 2: Ch 1, inc in each st around. Join with a sl st into the first sc. (12)
Round 3: Ch 1, sc in each st around. Join with a sl st into the first sc. (12)
Fasten off, leaving a sewing tail approximately 10 inches (25 cm) long.
The cap should form a shallow cup that sits over the closed top of the bauble.
Do not stuff the cap.
Place it over the closure and adjust its position so it is centered.
If the cap seems too loose or too tight, check your tension and confirm that each round has the correct number of stitches.
The contrasting cap adds a decorative finish and provides a suitable place to attach the hanging loop.
Easy Crochet Christmas Bauble Pattern: Assembly
Place the completed decorative cap over the closed top of the bauble.
The cap should cover the final decrease rounds without noticeably flattening the ornament.
Thread the cap’s long yarn tail through a tapestry needle.
Sew around the lower edge of the cap, attaching it to the bauble body with small, evenly spaced stitches.
Keep the stitches discreet and avoid pulling the cap too tightly.
Once the cap is secure, weave the remaining yarn tail into the body.
Cut approximately 8–10 inches (20–25 cm) of ribbon, twine, or matching yarn.
Thread it through the center of the cap and tie a secure loop.
For extra stability, pass the hanging material through the cap and a stitch of the bauble body beneath it.
Lift the ornament by the loop to check that it hangs straight.
If it tilts, reposition the loop closer to the center.
Your handmade Christmas bauble is now ready to display.
Easy Crochet Christmas Bauble Pattern: Finishing and Care
Gently roll the completed bauble between your palms to distribute the stuffing and improve its round shape.
Check that the decorative cap is centered and securely attached.
Use a tapestry needle to hide any remaining yarn tails inside the ornament.
The Easy Crochet Christmas Bauble Pattern does not normally require blocking because the body is stuffed.
Avoid applying direct heat or steam to the stuffed ornament.
For cleaning, follow the yarn manufacturer’s care instructions.
Cotton, acrylic, and blended yarns may have different washing and drying requirements.
If the ornament becomes dusty, gentle surface cleaning may be sufficient.
Allow it to dry completely before storing.
Keep finished baubles in a clean, dry container and avoid placing heavy objects on top of them.
Check the hanging loop before each holiday season.
FAQs and Troubleshooting for Easy Crochet Christmas Bauble Pattern
1. Why is my crochet bauble not perfectly round?
An uneven shape may result from missed increases, incorrect decreases, or uneven stuffing.
The widest section should contain 42 stitches from Rounds 7 through 15.
Check your stitch counts and distribute the fiberfill evenly.
Gently reshape the ornament after closing the final round.
2. Why can I see stuffing through the stitches?
Visible stuffing usually means the stitches are too loose or the ornament has been overfilled.
Try using a slightly smaller crochet hook to create denser fabric.
You can also reduce the amount of stuffing.
The bauble should feel firm enough to hold its shape without stretching the stitches.
3. Can I use cotton yarn instead of acrylic?
Yes. Cotton yarn works well for crochet Christmas ornaments and often gives the stitches a more defined appearance.
Choose a similar yarn weight and adjust the hook size if necessary.
Cotton may create a slightly firmer ornament than acrylic.
Always follow the yarn label for cleaning instructions.
4. How can I make a larger or smaller Christmas bauble?
The simplest method is to change yarn thickness and hook size while keeping the same stitch counts.
Use thinner yarn for a smaller ornament or thicker yarn for a larger one.
The finished measurements will vary according to yarn and tension.
For a substantially larger bauble, the pattern would need additional increase rounds and corresponding decreases.
5. Can I wash and reuse these crochet Christmas baubles?
Yes, if the yarn and stuffing are suitable for washing.
Check the care instructions for both materials.
Avoid harsh washing methods that may distort the stuffing or decorative cap.
Reshape the ornament while damp if appropriate, then allow it to dry thoroughly.
Store it in a clean, dry place between Christmas seasons.
Final Thoughts
This Easy Crochet Christmas Bauble Pattern is a lovely way to add handmade charm to your holiday decorations. Make several baubles in festive colors to decorate your Christmas tree, garlands, or handmade gifts. For more holiday crochet inspiration, explore our Crochet Christmas Star Ornament Pattern, try the adorable Easy Crochet Snowman Pattern, or create matching decorations with our Crochet Christmas Tree Ornament Pattern. These beginner-friendly projects are a wonderful way to build a coordinated collection of handmade Christmas ornaments.