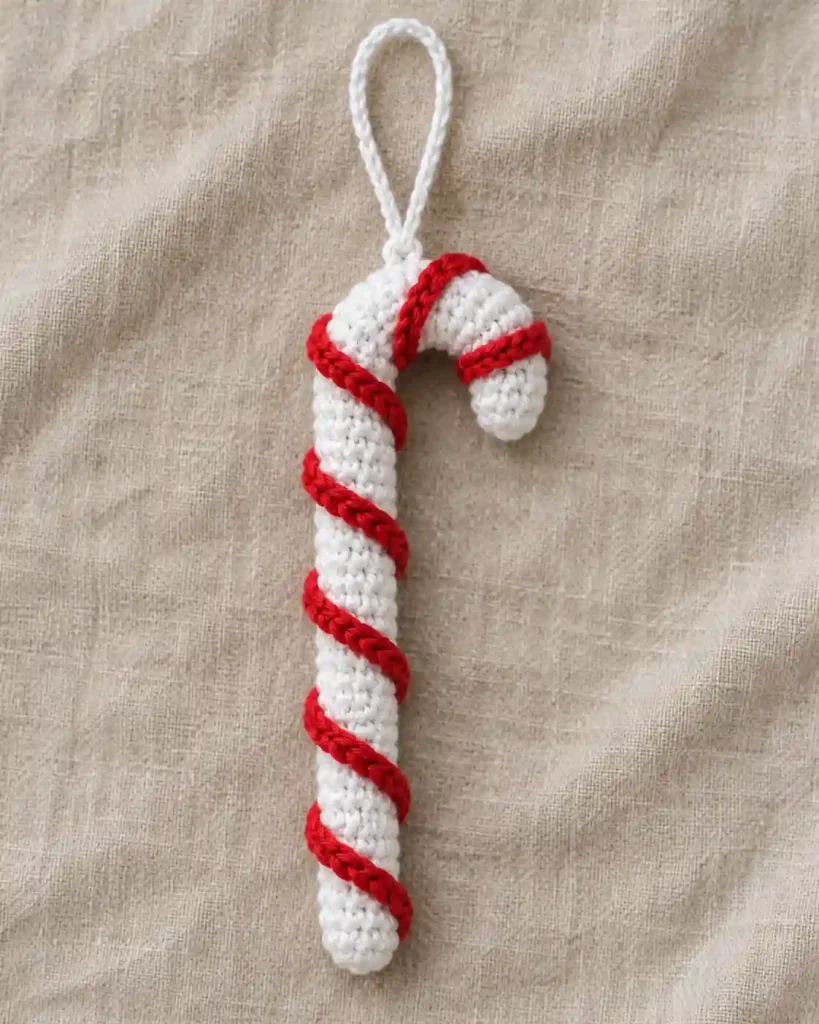
Crochet candy cane ornament pattern projects bring classic red-and-white color to Christmas decorating. This tutorial explains a white crochet tube, a separate red spiral, and a bendable center. Display yours beside a crochet Christmas bauble pattern or mini Christmas wreath ornament. For another construction technique, explore Stitch by Fay’s candy cane tutorial. Below, you will find materials, stitch counts, shaping instructions, and finishing advice.
Crochet Candy Cane Ornament Pattern at a Glance
This crochet candy cane ornament pattern suits confident beginners who can work small rounds and sew simple attachments. You will crochet the white body first, then add the red stripe separately.
Unlike stripes worked through color changes, the wrapped chain creates a slightly raised surface.
| Feature | Details |
|---|---|
| Skill level | Confident beginner |
| Terminology | US crochet terms |
| Yarn | Category 3, light/DK weight |
| Hook | 2.75 mm |
| Body construction | Continuous single-crochet rounds |
| Stripe construction | Separate chain, wrapped and sewn |
| Estimated straight length | Approximately 15–17 cm |
| Estimated shaped height | Approximately 11–13 cm |
| Gauge | Flexible; dense fabric matters most |
| Testing status | Original design; not physically tested |
These dimensions are estimates. Your tension and shaping will affect the result.
No measured making time is available. Allow extra time for inserting the support, positioning the stripe, and securing its attachments.
Crochet Candy Cane Ornament Pattern: Materials and Yarn Quantities
For this crochet candy cane ornament pattern, choose smooth yarn with clear stitch definition. Cotton or a firm cotton blend helps the raised stripe remain visible.
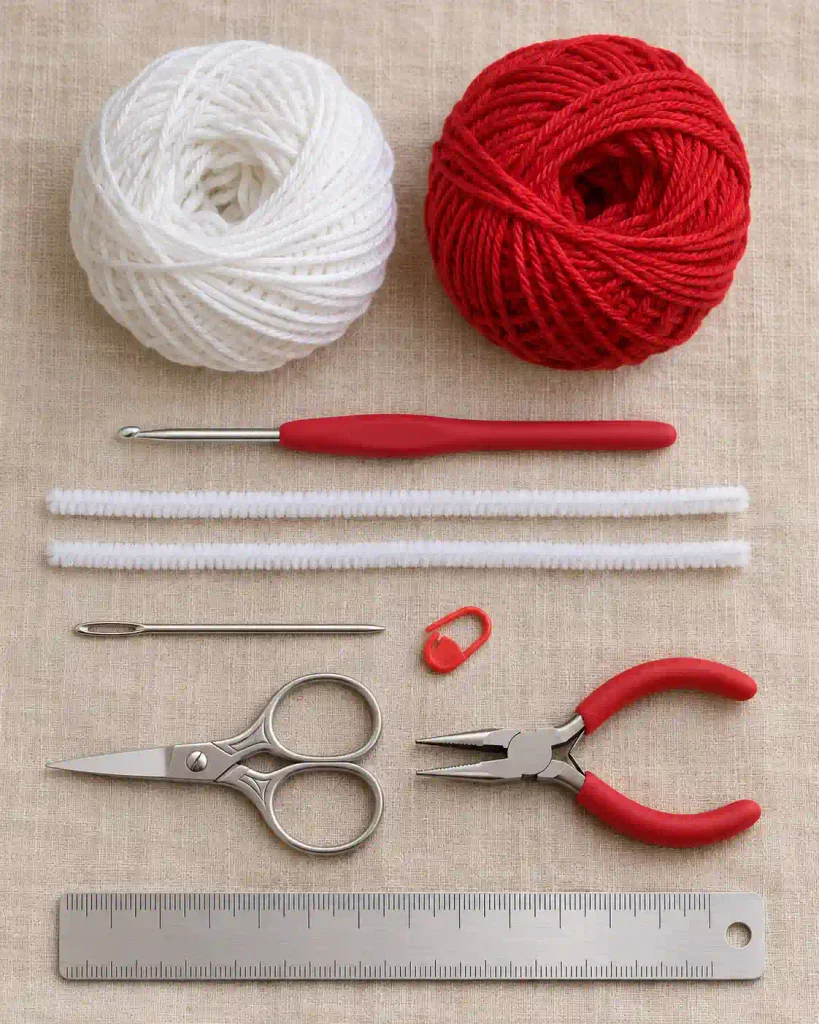
Gather these supplies:
- White DK yarn: Approximately 15–25 m for the body, sewing, and hanging loop.
- Red DK yarn: Approximately 5–10 m for the chain stripe and attachment stitches.
- 2.75 mm crochet hook.
- Two approximately 30 cm craft pipe cleaners, preferably white.
- Yarn needle.
- Removable stitch marker.
- Scissors.
- Ruler or measuring tape.
- Small pliers for folding wire ends securely.
Yarn quantities are untested allowances rather than measured consumption. Grams depend on your chosen yarn’s labeled meterage.
Use similar yarn weights for both colors. A much thicker red chain can overwhelm the narrow body.
The pipe cleaners supply the internal structure; this version uses no stuffing. Fold their ends inward before insertion.
Because the ornament contains wire, use it as a display decoration rather than a toy.
Crochet Candy Cane Ornament Pattern: Abbreviations and Special Stitches
This crochet candy cane ornament pattern uses US terminology.
- ch: Chain.
- sc: Single crochet.
- st / sts: Stitch / stitches.
- inc: Work 2 sc into the same stitch.
- MR: Magic ring.
Parentheses show a repeated sequence. For example, (sc, inc) three times means repeat that sequence three times.
Bracketed numbers indicate the completed stitch count.
Work the body in a continuous spiral. Do not join rounds or make starting chains between them.
Move the stitch marker into the first stitch of every new round.
For single crochet, insert the hook into the indicated stitch and pull up a loop. Yarn over and pull through both loops.
Work through both loops throughout the body.
Crochet Candy Cane Ornament Pattern Gauge, Size and Notes
Gauge is flexible for this crochet candy cane ornament pattern, but the fabric must cover the internal support.
The straight tube should measure approximately 15–17 cm, with a shaped height around 11–13 cm. These dimensions are untested estimates.
Measure along the tube before bending. After shaping, measure vertically from the highest curve to the bottom tip.
If the fabric has visible gaps, try a smaller hook. Conversely, use a slightly larger hook if crocheting becomes uncomfortable.
The body begins with 6 stitches, increases to 9, and then maintains that count.
The red chain length is adjustable. Its required length depends on the tube’s circumference and your preferred stripe spacing.
Make the body first rather than guessing the final stripe length.
Leave the tube’s upper end open until you have fitted the support.
Crochet Candy Cane Ornament Pattern: Method Overview
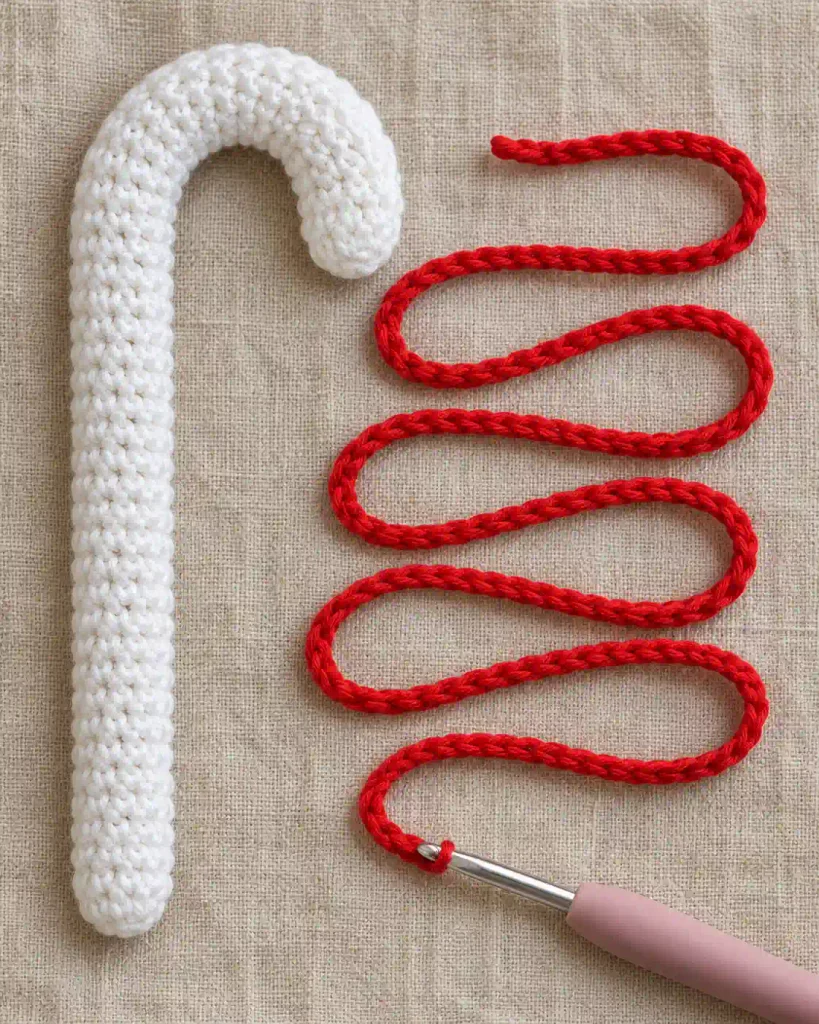
Begin this crochet candy cane ornament pattern by crocheting a narrow white tube. Its closed starting end becomes the bottom of the cane.
Next, prepare the pipe-cleaner support. Twist the stems together, fold them, and turn all exposed ends inward.
Slide the support inside the tube, then close the remaining opening with the white yarn tail.
Afterward, bend the upper section into a rounded hook. Shape gradually instead of creating a sharp fold.
Crochet a red chain and wrap it around the finished body. Adjust its length until the spiral sits evenly without squeezing the tube.
Sew the chain in place at regular intervals. Finally, attach a hanging loop near the curve.
If you plan to make a crochet Christmas garland, use matching colors across the decorations for a coordinated display.
Step-by-Step Candy Cane Tutorial
Part 1: Crochet the White Tube
Start the body of your crochet candy cane ornament pattern with white yarn and a 2.75 mm hook.
Round 1: Make an MR. Work 6 sc into the ring. Tighten the ring and mark the first stitch. [6 sc]
Round 2: Work (sc in the next stitch, inc in the next stitch) three times. [9 sc]
Rounds 3–36: Sc in each stitch around. [9 sc per round]
Rounds 3–36 contain 34 rounds altogether. Keep moving the marker so you can track each completed round.
After several rounds, secure the magic-ring tail inside the tube. This becomes harder once the tube grows longer.
At Round 36, measure the body without stretching. If necessary, add or remove plain rounds to approach 15–17 cm.
Every additional round still contains 9 sc.
Fasten off, leaving approximately 30 cm of white yarn. Keep the upper opening accessible for inserting the support.
Do not close this opening yet.
Part 2: Insert the Support and Shape the Hook
Before insertion, prepare the support away from the crochet fabric.
Place the two pipe cleaners together and twist them gently into one thicker stem. Then fold that stem approximately in half.
Bring the cut ends together. Using pliers, turn both ends inward and press them against the stem. The opposite end should form a smooth folded bend.
Aim for a support approximately 1–2 cm shorter than your tube. Adjust by folding more length inward rather than leaving exposed wire.
Insert the folded bend first through the open end. Slide it toward the tube’s closed starting end.
Do not force the support through tight stitches. If it catches, withdraw it and check for projecting ends.
Once fitted, leave a little crocheted fabric beyond both ends of the support.
Thread the white tail through the front loops of all 9 opening stitches. Pull gently to close, then secure the tail.
Finally, bend roughly the upper third into a broad hook. Keep the lower section straight.
The curved tip should point downward without pressing against the long stem.
Part 3: Crochet and Position the Red Spiral
The stripe in this crochet candy cane ornament pattern is a separate chain.
With red yarn, leave a starting tail approximately 25 cm long.
Stripe: Ch 80 as an initial trial length.
Do not fasten off immediately. Place a removable marker through the working loop so it cannot unravel.
Position the chain’s starting end near the bottom of the cane. Wrap the chain diagonally around the body, continuing over the curve.
Aim for approximately five to seven turns, depending on your preferred spacing.
The chain should rest against the surface without compressing it.
If it falls short, add chains. If it extends beyond the upper tip, unravel the excess.
Record the final chain count if you intend to make matching ornaments.
Once satisfied, fasten off, leaving approximately 60 cm for attachment stitches.
Check the front and back before sewing. Keep the spiral spacing reasonably consistent, especially around the curved section.
Avoid pulling the stripe tighter along the inside of the hook.
Crochet Candy Cane Ornament Pattern: Assembly
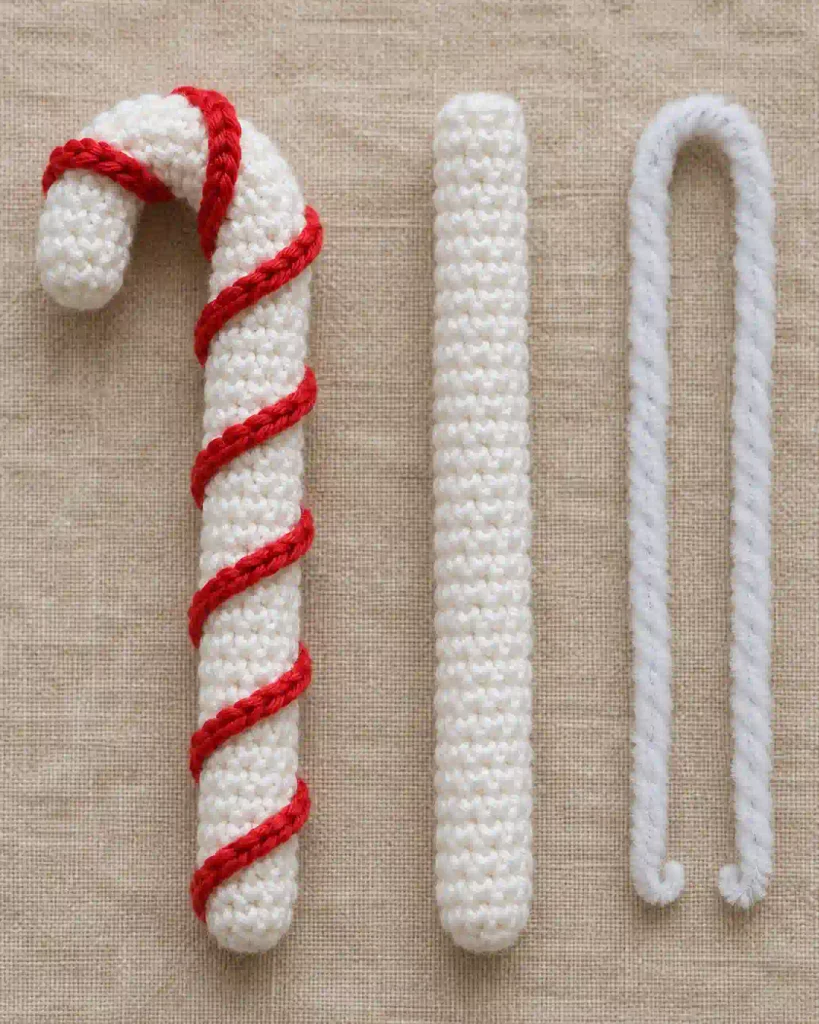
To assemble this crochet candy cane ornament pattern, secure the stripe’s starting end near the bottom tip.
Use its starting tail to make several small stitches through the white fabric. Catch the red chain without drawing it into the tube.
Next, use the longer red tail to tack the spiral in place. Add approximately two or three attachment stitches per complete turn.
At each point, catch the underside of a chain link and a small section of white fabric. Travel beneath nearby stitches between attachments.
Add extra tacks around the curve, where the chain may shift.
If the sewing tail runs short, secure it and continue with another red length.
For the hanging loop, cut approximately 25 cm of white yarn. Pass it beneath two neighboring stitches near the curve’s upper outside edge.
Tie a secure loop approximately 5 cm tall. Test the hanging position before hiding the ends.
Crochet Candy Cane Ornament Pattern: Finishing and Care
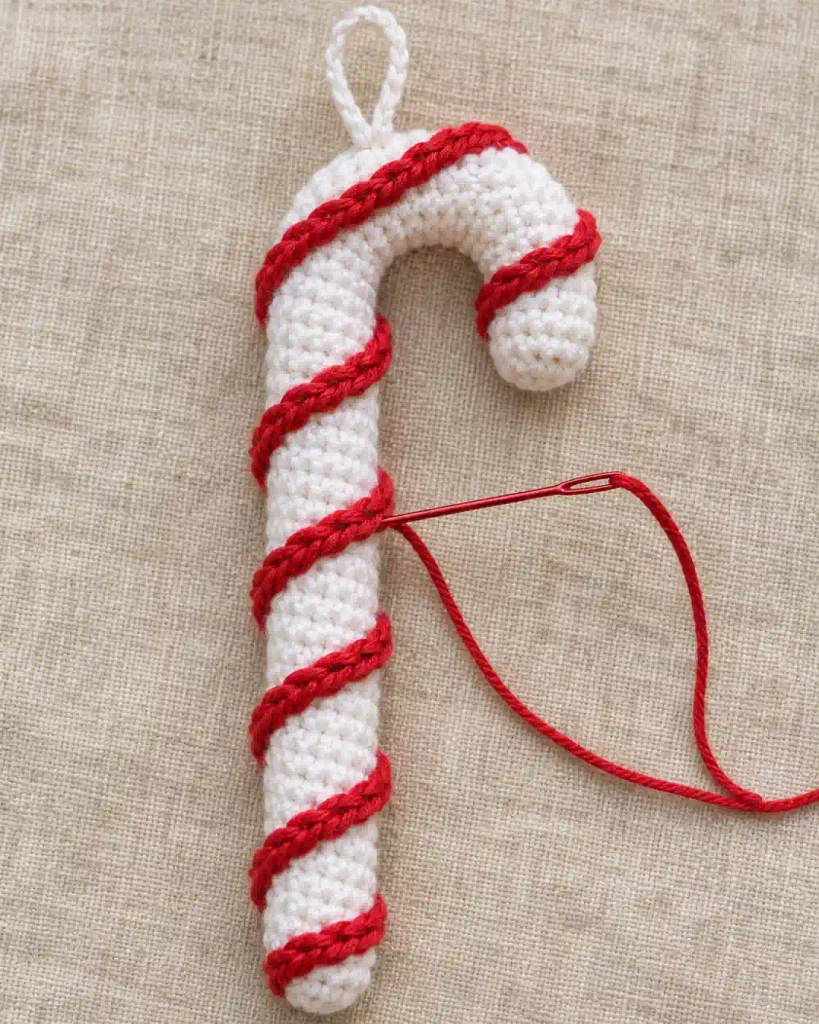
Weave all yarn tails securely through nearby stitches. Change direction before trimming so the ends resist slipping free.
Check the stripe from every side. Adjust uneven sections before tightening their attachment stitches.
Avoid aggressive stretching or blocking because the internal support already controls the shape.
For cleaning, follow the yarn label while considering the enclosed wire. Unless the support manufacturer confirms washability, avoid soaking the ornament.
Instead, remove dust gently and spot clean the surface when appropriate. Let the piece dry completely before storage.
Inspect both tips for protruding wire and check the hanging loop’s knot.
Finally, store the cane without crushing its curve. Avoid repeatedly bending the same point, which can weaken the internal support over time.
FAQs and Troubleshooting for Crochet Candy Cane Ornament Pattern
1. Why does my tube have ten stitches instead of nine?
You may have added an increase or worked twice into the marked stitch. Round 2 contains three single crochets and three increases, producing 9 stitches. All following rounds stay at 9. Count back to the first incorrect round, then unravel and correct it before continuing.
2. Why does the curved section look flattened?
The support may have a sharp bend, or the red chain may be too tight. First, loosen the stripe attachments around the curve. Then reshape the support into a broader hook. Avoid pulling the chain across the inner curve. Tack it where it naturally rests against the fabric.
3. Can I substitute another yarn weight?
You can substitute yarn in this crochet candy cane ornament pattern, but the tube size and support fit will change. Choose a hook that produces dense fabric. Check the opening after several rounds. A thicker tube may need a different support, while thinner yarn may make insertion difficult.
4. How can I make a longer candy cane?
Add plain rounds of 9 sc before fastening off the white body. Measure the support against the longer tube before insertion. You will also need a longer red chain. For a shorter ornament, remove plain rounds while keeping enough length to form the upper hook comfortably.
5. How should I clean an ornament containing pipe cleaners?
Avoid assuming that the enclosed wire tolerates washing. Follow the materials’ care guidance, and favor gentle surface cleaning when wire washability is unknown. Keep the ornament away from prolonged dampness. After cleaning, let it dry thoroughly and check for discoloration, exposed ends, or loosened attachment stitches.
Final Thoughts
This crochet candy cane ornament pattern combines a simple tube with a raised red spiral and a bendable center. Begin with one sample, since the dimensions and yarn allowances remain untested. Check the support fit before closing the body, then adjust the chain length around the shaped cane. Small attachment stitches will help the stripes stay evenly spaced. For another handmade decoration, pair your finished piece with a crochet angel ornament pattern. Record your final round and chain counts when making a collection. Finally, check the enclosed wire ends and hanging loop before displaying your ornament.